 Preview display
Preview displayThe main working window. This displays the final rendering in real time before any calculation is initiated!
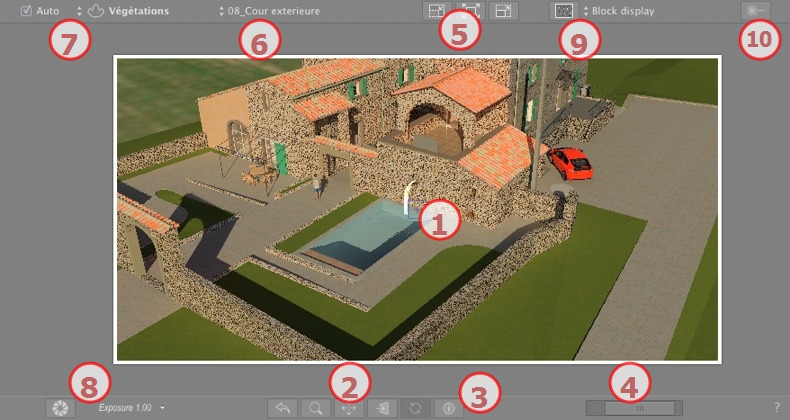
Displays the scene in real time looking as it will be once rendered except for the anti-aliasing which is not taken into account. Any changes are immediately reflected.
From left to right: Back, Zoom, Pan, Face To and Update.
 Resets the camera to the position defined when the view has been activated.
 Moves the camera (the zone defined by a rectangle); Alt+Zoom to move backwards.
 Pans the scene by moving the current camera.
 Positions the camera perpendicular to the clicked surface.
 Saves the viewpoint position (viewpoint, target, focus distance and camera roll). This tool only works when the Automatic Update option is activated in the General Preferences.
Both the toolbar commands (Navigation, Zoom, Pan and Front View) and the Keyboard and Mouse Shortcuts specific to the Preview window are used to navigate within a scene.
 Displays the scene settings.
To adjust the position, use the cursor; to adjust the size, scroll the mouse on the cursor.
To adjust the size, scroll the cursor on the slider. To adjust the position, move the slider to the left or to the right.
From left to right: Decrease the size, Adjust to the available working space and Increase the size.
Drop-down menu to navigate in Viewpoints.
Drop-down menu: Destination of a layer when dragging and dropping an object into the scene.
If Auto is checked:
When you drag and drop an object into the scene, it will go into the layer appropriate to its type or into the active layer if there is no default destination layer for this object type.
If Auto is unchecked:
The pop-up menu for the layer shows the destination layer for an object during a drag-and-drop into the scene, as long as there is no default destination layer for this object type.
 Auto lighting when the button is on.
Delivers better compliance with the colors and their brightness, as well as better contrast and sharpness.
In the bottom of the Preview, ISO and Shutter Speed parameters are displayed; values can be changed by typing new ones or by sliding the cursors.
ISO from 1 to 32,000; Speed Shutter from 1 to 16,000.
Two modes, ISO and Exposure: click on the button to toggle between them.

ISO: sets the sensitivity of the sensitive surfaces; values range from 1 to 32,000. Shutter Speed: sets the exposure time; values range from 1 to 16,000.

Exposure: values range from 0 to 2.
 NB: These options are available in the rendering parameters of the viewpoint.
In Viewpoint Rendering Parameters, due the time required to display them, the effects Ambient Occlusion, Enhanced Sky and Displacement are not seen straight away in Preview. To see them, it is necessary to click on the Refine the preview  button.
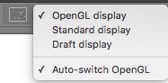
OpenGL display: the model will be displayed in OpenGL without realistic lights, cast shadows or transparency. Navigation is very fast but is downgraded.
Standard display: the model is displayed with 100% pixels.
Draft display: compare with Standard display the model is displayed faster with 25% pixels.
Auto Switch OpenGL: while moving the camera the model will be displayed in OpenGL without realistic lights, cast shadows or transparency. Navigation is very fast but is downgraded.
NB: Auto Switch Open GL can be combined with Render by Surfaces or Render by Blocks. When the mouse is released, the Render by Option is used.
Switch On  or Off
  to display the laser effect. The laser tool is managed into the Viewpoint Inspector.
Working with Shaders in Preview
Working with Textures in Preview
Working with Lights in Preview
Working with Objects in Preview
Working with Objects in Preview: Replace Objects
|
Artlantis User Guide:Preview Window |
|
© 2016 Abvent www.artlantis.com |