 The Objects Inspector by Layer
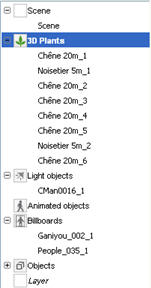
The Objects Inspector by LayerGeometry elements are always contained in layers.
The layers come either from the CAD software, or are created in Artlantis.
The Inspector dialog changes according to which option is selected from a list.
There are three selection options:
Selecting more than one layer enables their visible/invisible status to be changed depending on the viewpoint.
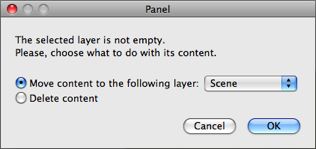
Selecting multiple objects enables them to be moved to another layer.
Clicking the name of an object in the list makes its insertion point flash in the Preview window.
The name of the layer selected in the list is highlighted, select it to rename it.
 NB: in Artlantis, renaming a layer created in the CAD software breaks the link to this layer. In this case, modifications made using the "Use a reference file..." command will not be recognized.
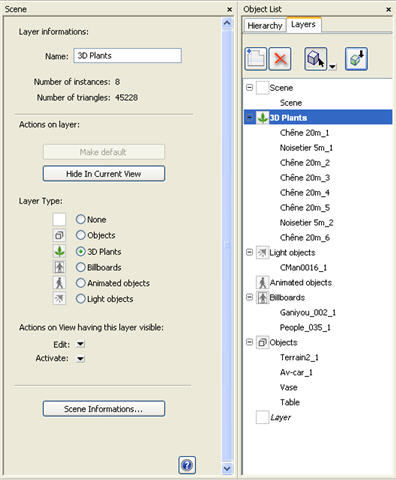
name, number of instances contained, number of triangles making up the geometry
When you drag and drop objects into the Preview window, they can be stored automatically in the layers. This is done by telling these objects what their destination layer is beforehand.
When a project is opened, Artlantis always assigns a default layer, its name is displayed in bold. This layer receives any object added into the scene until another layer is declared as the "Default layer".
However, you can automatically associate certain types of object with certain layers
None: by default, the component dragged and dropped into the scene is stored in the layer whose name is shown in bold, except if this type of component has already been associated with a specific Objects, 3D Vegetation, Billboards, Animated objects or Objects with light layer.
To define a specific layer which is to contain a certain type of component, a new layer must be created in the list or an existing layer chosen, then in Layer type, select the type.
Any layer in the list can be chosen. In the list, the symbol concerned will be assigned to the layer icon.
 Example: you create a new layer. Then in Layer type, you click on Objects. All components (objects) dragged and dropped will be stored automatically in this layer.
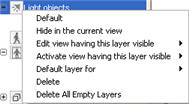
Edit: depending on the layer selected, lists only the viewpoints where this layer is visible. In the popup menu, select the name of the view. The Inspector changes to Viewpoint inspector and the selected view is displayed.
Activate: depending on the layer selected, lists only the viewpoints where this layer is visible. In the popup menu, selecting the name of the view activates it without changing Inspector.
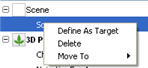
Right-clicking geometry contained in the layer displays a popup menu with the following options:
NB: the settings related to the geometry cannot be edited (name, coordinates, dimensions).
 in the layer list. A new layer is added, click on the name of the layer to rename it.
NB: renaming or deleting layers which have been created by the CAD software breaks the link with it when the "Use a reference file..." command is used.
When a layer is selected in the list, right-clicking the layer name displays a popup menu which lets you:
NB: multiple selection is available with these commands.
 , Billboard.
The objects are available in the Media catalog
|
Artlantis User Guide: Objects Inspector - layers |
|
© 2009 Abvent www.artlantis.com |
 See Also