 Lights Inspector
Lights InspectorEdit lighting schemes based on viewpoints. Interactive settings and immediate results in the Preview window. Using the appropriate and correctly adjusted light model enhances the work carried out on the materials. Light groups may be attached to one or more viewpoints. The lights are characterized by an illumination limit and a maximum illumination area.
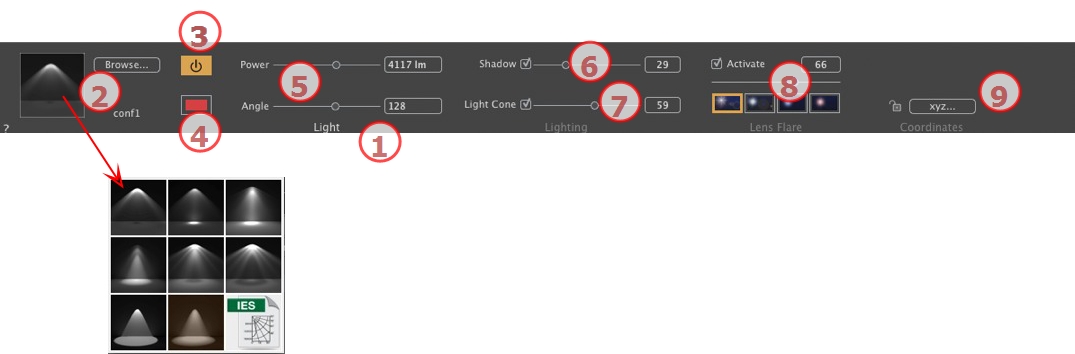
The name of the current light is displayed; double click on it to edit it.
Determine the lighting projection (fall-off) from eight predefined types or click on the IGES icon to upload an IGES profile.
 NB: An IGES profile corresponds to the physical characteristics of a lamp: the power, lighting profile and color. In Artlantis, you upload an IGES profile for a light but you can still define its power and color.
Source power. Values range from 1 to 1,000,000 lumen. Move the slider to change the power or enter a value.
Double click to modify the source color.
Calculates the attenuation distance for the lighting power.
Between the attenuation distance and source, the lighting power remains constant and at maximum.
The distance beyond distance A corresponds to the gradual diminishing of the lighting power at 1/d². When the attenuation value equals 0, the light diminishes at 1/d², starting at the light source.
NB: In this area, the illumination principle is based on reality. The closer an object is placed to the light source, the more illuminated it appears.
Activate/Deactivate Shadow Casting: Click on the box to check it.
Check the box. When checked, the slider varies the Sharpness on the edge of the illuminated area. Values range from 0 (diffuse area between the shadow area and the illuminated area) to 100 (upper limit). Accepts numerical values.
Change the Lighting Angle.
Check the box to activate the volumetric effect.
Move the slider from 10° to 360° or type in a numerical value.
Example: A value of 360° provides omnidirectional light.
NB: If unchecked, the light goes through the materials and does not cast shadows.
Activate/Deactivate: Check the box to activate the Lens Flare effect.
Halo Power: Move the power slider or type in a value between 0 and 100%.
Choose effect: Click on one of the thumbnails:
Clicking on the xyz... button opens the coordinates dialog.
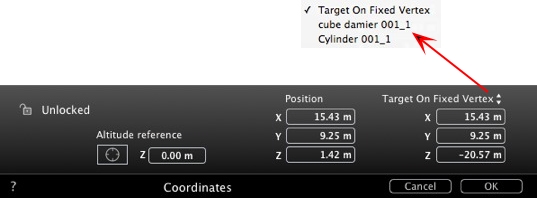
Padlock: Click on the icon to lock or unlock the coordinates.
Camera position: X, Y and Z positions.
Target position: X, Y and Z positions.
Define As Target: Allows you to limit a camera's target to an object's movement: In Object mode, right-click on an object and select "Define As Target" in the drop-down menu. Then, in Lights mode, select the name of the object in question in this menu.
Altitude reference: Allows you to define a position in reference to a clicked geometry.
The multiple selection is represented by shaded icons as well as dots in the numeric fields.
When you change a parameter, it will be changed for all selected lights.


 Example
|
Artlantis User Guide:Lights Inspector |
|
© 2016 Abvent www.artlantis.com |