 Neon Glazing Shader
Neon Glazing Shader

 NB: The arrows for a material can be used to navigate between related Shader and Textures editors.
Drag the slider to increase power or enter a value (from 0.1 to 5,000) in the related field. Click to choose a color from the system color picker.
This is the color of the Transparency. To change it, click on the rectangle. The system color picker is opened. The darker the color, the less transparent the Shader will be.
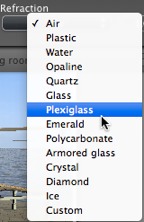
Distorts the appearance of an element placed behind a material to a greater or lesser extent. Enter a numeric value or choose the desired type in the contextual menu.
This is the color of the Reflection. To change it, click on the rectangle. The system color picker is opened. The darker the color, the less reflective the Shader will be.
Shininess: Using the cursor gives a rather plastic appearance to the left and a more metallic appearance to the right. Values range from 0 to 1,000.
Limit: Entering a Limit value defines the maximum distance of the reflection. The value 0 means that the environment is reflected to the infinite.

Create a new Shader from an existing Shader.
|
Artlantis User Guide:Neon Glazing Shader |
|
© 2013 Abvent www.artlantis.com |