 Procedural Shader
Procedural ShaderThese Shaders have the same interface: Carbon Fiber, Gravel, Lawn, Marble, Mosaic, Paving, Bricks, Chain, Ebony, Rust, Sunblind, Leather, Fabric, Sheet Metal, Bebeer, Cedar, Elm, Exotic, Mahogany, Granulated Glass, Brushed Aluminum, Chromium Scratched, Hammered Metal, Oxidized Metal, Perforated Sheet, Carpet, Coating, Roof Tiles, Planking, Stone, Tile, etc.

 NB: The arrows for a material can be used to navigate between related Shader and Textures editors.
Check and click on the selector to choose a color.
Use the circular cursor (Shift + Click, increments every 15°) to turn the texture on its axis or enter a value in the relevant field.
Shift + click increments every 15°.
Set the size either by dragging the cursor, clicking on the slope to increment the value or clicking on the line, or type a height value in the numeric field.
Drag the slider to make the material reflect its environment or enter a value in the related field.
Using the cursor gives a rather plastic appearance to the left and a more metallic appearance to the right. Values range from 0 to 1,000.
Use the slider or enter a value in the related field to simulate the effect of bumps or hollows on the surface of the material.
Double click on the diode to cancel the effect.
Gives a distorted appearance to any element reflected in the texture. Use the slider or enter a value in the related field to simulate the distortion.
Apply a level of transparency to the texture or enter a value in the related field. Click on the diode to cancel the effect.
Use the slider or enter a value in the related field. Gives a retro lighting effect to the Shader.
Adjusts the image to the surface on which it is placed. Automatically selects the settings best suited to the project.
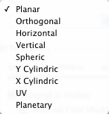
Planar: Is applied to a plane.
Orthogonal: Is applied to an element. If the element is composed of surface planes, the texture follows the surface planes.
Horizontal: The Shader is required to be set horizontally.
Vertical: Vertical projection on the element. The horizontal parts receive the image, while the vertical or tilted parts are stretched.
Spherical: Adopts a spherical form that depends on the size of the texture. It may therefore leave empty spaces.
Y Cylindric: The texture is projected around the axis of a vertical cylinder.
X Cylindric: The texture is projected around the axis of a horizontal cylinder.
UV: Maintains the texture coordinates on an object coming from software that manages UV maps.
Planetary: Vertical projection of the element while passing through the poles, without leaving spaces.

Create a new Shader from an existing Shader.
 Example
|
Artlantis User Guide:Procedural Shader |
|
© 2016 Abvent www.artlantis.com |