 Timeline Window
Timeline Window
Animation work is done using the Animations, Lights, Heliodons or Objects and the 2D View, Preview window and the Timeline window.
The Timeline enables the user to record, edit and play a scene. The scene is made up of sequences that are managed in the Animations Inspector List.
Activating the Animations Inspector displays the Timeline window.
The Timeline is docked in the Artlantis window.
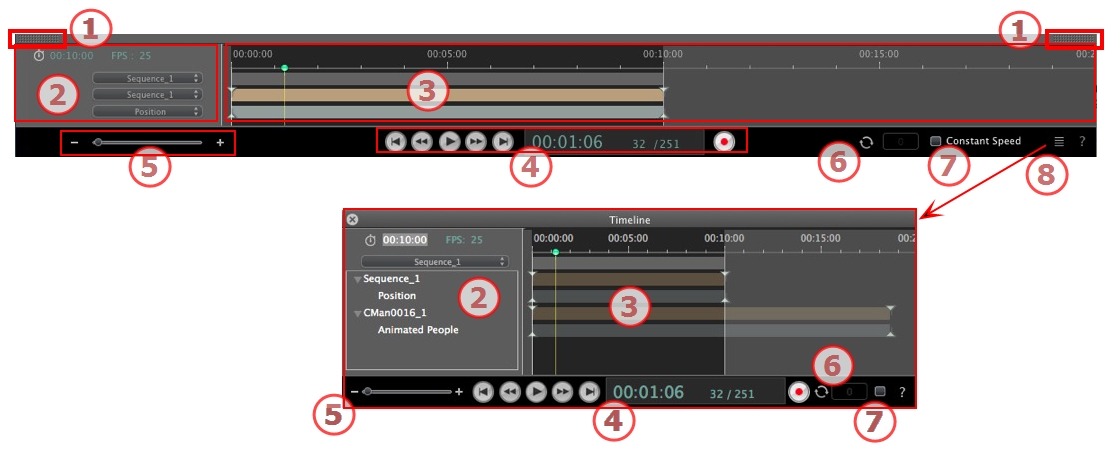
When the Timeline is displayed in Artlantis window, at any given time we only see the current sequence, the type of animated element and one type of animation.
When the Timeline is not docked (floating), it is displayed in an independent window.
When the Timeline is displayed independently we see the whole sequence with its animated elements and all the types of animation attached to these elements, such as the position, the rotation etc.
By default, the drawer is opened when the mouse is moved, bringing the cursor to the bottom of the Artlantis window, and is automatically closed when the cursor moves out of the Timeline. In both sides, clicking on the icon forces the Timeline to stay open, and another click returns to the auto-retractable function.
Indicates the length of the current sequence. Expressed in minutes and seconds (mm:ss). Entering a value updates the duration.
Rate at which images are played per second. Entering a value updates the number of frames played.
The drop-down menus can be used to display the current sequence.
When the Timeline is docked
The first of the three menus shows the current sequence. Click on it to select another one.
The second menu displays the current animated element.
The third one displays the events applied to the animated element, such as position, rotation, etc.
When the Timeline is displayed independently
The drop-down menu shows the current sequence. Click on it to select another one.
Below this is the thumbnail before the name of the current animated element.
Below that is the event type of the animated element, position, rotation, etc.
Gives duration of the sequence with a slide bar and a cursor for positioning and editing keys of the sequences.
The cursor shows the current sequence time at instant T.
 NB: The current position also displays in 2D View, if the element is animated on a path.
Click and drag to move the cursor. The cursor is green. When a key frame passes, it sticks to the pin and becomes red. The cursor also becomes red when passing on a guide.
The cursor moves away from it when:
• The time is edited
• The current sequence is played
• The mouse wheel can be used to zoom in or out on the scene when rolling over the time scale.
The sequence is delimited by its stripes.
The start, end or duration of the sequence can be modified by clicking and dragging the pins to change them individually.
The entire sequence can be moved without changing the duration by clicking and dragging it on the blue line.
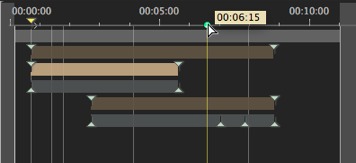
A tooltip indicates the current position in min:sec on the Timeline.
NB: The key frames and guides do not follow the movement. Subsequently, the numeric Time and Duration fields are updated.
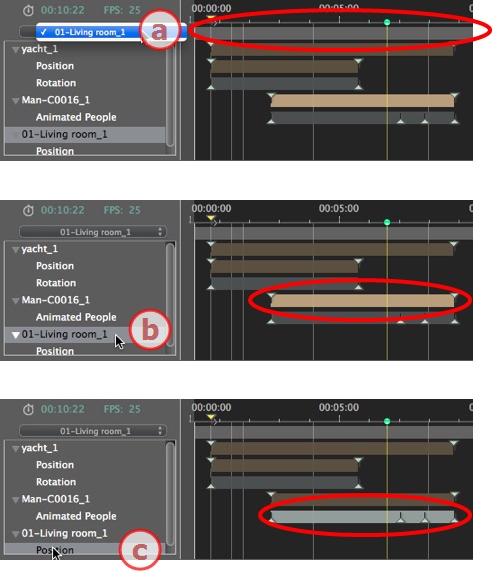
a: The current sequence
b: An animated element of the sequence with its keys.
c: The event of the animated element with its keys.
Controls recording and playback of animations.
Allows you to navigate in time through the scene, and to play or stop playback of the sequence. The cursor moves as a result.
Description of buttons from left to right:
Indicates the cursor's current position in the time scale. Expressed in hours, minutes and seconds (hh:mm:ss). Entering a value updates the position of the cursor.
Frame number/Total frame number: enter a number into the numeric field, and the cursor jumps to the position the frame is displayed.
To start or stop a recording.
NB: Sequence playback can be started or stopped by pressing the space bar.
Indicates the duration of the sequence between the start and end pins. Expressed in: minutes: seconds: image number. Entering a value updates the position of the end pin. Dragging the pins updates the sequence duration.
Use the Time scale zoom cursor. The Time bar shows the entire scene or can focus on just a portion of it.
Repeats an action several times in a sequence. Enter a value to specify the number of loops. The loop is applied to the parameter of the current animated element.
Unchecked, the beginning and the end of the sequence has a speed progression.
Checked, the speed remains constant all along the sequence.
OpenGL check-box: Displays the Preview window in OpenGL to thin the viewing.
Clicking detaches the Timeline from the Artlantis Window.
Artlantis animates practically all commands relating to the inspectors:
Begin as follows to animate the parameters for cameras, lights, heliodons, objects and animated textures:
Activate the Lights, Heliodons, Object or Shaders inspector.
Comment: The Timeline window will remain open to enable you to edit animation times.
NB: In 2D View, the Timeline and the appropriate inspector must remain open in order to create and edit animated paths for lights, objects or cameras.
These appear as colored guides distributed throughout the time scale.
A pin represents a particular animation event at an instant T. A camera, light, heliodon or object element for which one of the position, rotation, scale, etc. parameters has been modified.
Animation is represented between two keys.
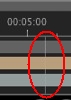 These serve as visual markers when synchronizing animated parameters.
Makes a sequence or edit of animated elements the current one, whereupon the appropriate inspector is displayed.
Right click above the time scale.
Shows the type of animation attached to the current element (position, rotation, lighting power, atmosphere, etc.). Updates depending on which item is selected in the Animations pop-up.
Right click below the time scale.
NB: Water Fresnel Shader can be animated when Animation has been checked in the Shader Inspector.
Clouds can be animated when Activate Wind Direction has been checked into the Heliodon Inspector Animation parameters.
|
Artlantis User Guide:Timeline Window |
|
© 2013 Abvent www.artlantis.com |