 19 - The Panorama Inspector
19 - The Panorama Inspector
 Panorama List: for handling panoramas on the list shown.
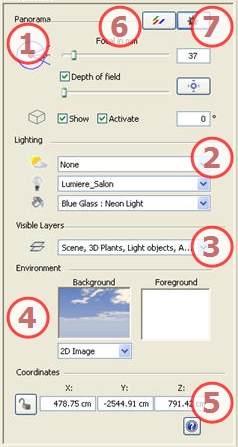
Focal Length: Changes the focal length when the slider is used or a value is entered in mm or degrees (adjusts the angular opening of the camera).
Depth of Field: click  then, in the Preview window, click to define the clear point of the scene, with the rest remaining blurred. The cursor adjusts the blur amount.
Clipping Box: for defining clipping planes.
Show: in 2D View
Activate: Representation in Preview mode
To handle light schemes linked to the view, select them from the drop-down menus.
Heliodon: links a heliodon to the view. Selecting "None" deactivates the heliodon.
Light Group: Links one or more light groups to the view. Selecting "None" deactivates the light groups.
Neon Shaders: Links one or more Neon Shaders to the view. Selecting "None" deactivates the lighting.
Handles the background and foreground of the scene.
Define a background: Background type: 3D Sky, Gradient, 2D Image, 3D Image, 3D Cubic
Camera XYZ Position.
Clicking on ![]() locks them and clicking on
locks them and clicking on ![]() unlocks them.
unlocks them.
Applies effects to the current viewpoint: The effects combine into, as well as with the parameters set in the inspector.
Prepares the document for final rendering.
 NB: editing the scene information such as the infinite ground, movement of the origin, redimensioning of the model and the coordinates may be accessed via the Window menu.
|
Artlantis User Guide: The Panorama Inspector |
|
© 2009 Abvent www.artlantis.com |