 VR Objects Rendering Settings
VR Objects Rendering Settings

In the VR Objects View Inspector, clicking on the Render icon displays the specific rendering parameters.
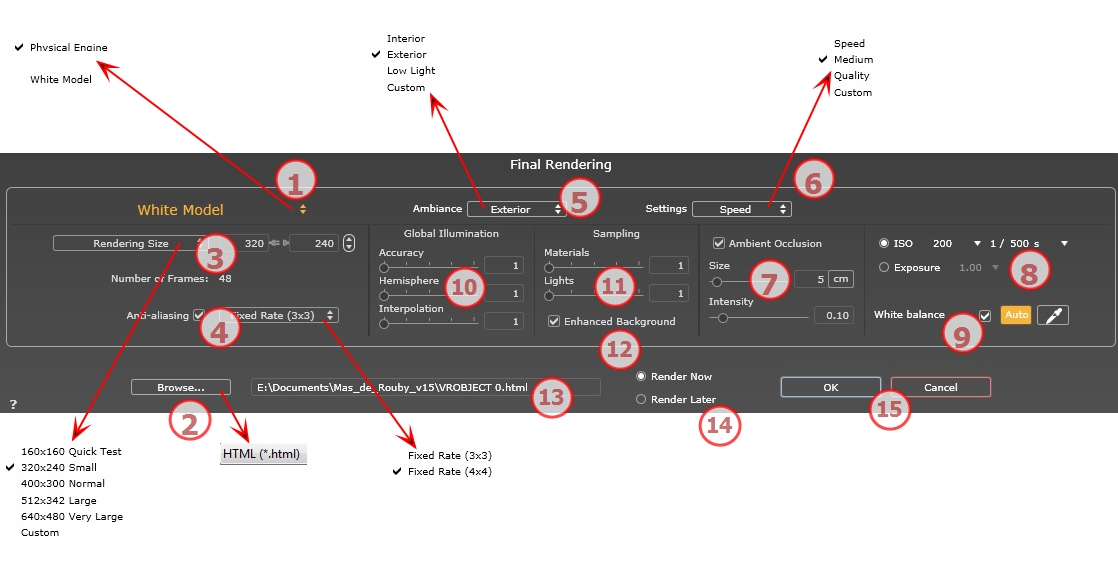
In the drop down menu choose one of the rendering engines names, White Model, Physical Engine, displays the according parameters.
White Model: All materials dressed with Shaders or textures are assigned to a unique diffuse white color; reflections will be ignored. The color of the heliodon, the lights, the shadows, the background and the foreground are taken into account.
Physical Engine: The high rendering quality. engine.
A unique file format: html.
 Tip: The html format is readable on a computer. To play the panorama on an iOS or Android device, use the .pno file located beside the html files.
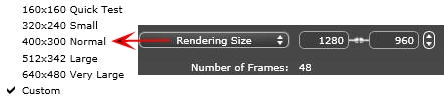
Select a size from the menu or
Enter the Width and Height in pixels.
Increase/decrease the values by two by clicking on the arrows.
Information on the number of images to be rendered to make up the VR Objects depending on vertical and horizontal step.
Check that the anti-aliasing is on; set the quality to:
Fixed Rate 3 x 3: anti-aliasing is applied to an image calculated three times wider than the original.
Fixed Rate 4 x 4: anti-aliasing is applied to an image calculated four times wider than the original.
Tip: Start rendering with the Fixed Rate 3 x 3 mode: it is the fastest. However, if some small details seem inaccurate or missing in your rendering, go for a Fixed Rate 4 x 4. Starting with a high value is not recommended as the rendering time will increase and, depending on your scene, it may not be worth the additional time spent.
In the drop down menu choose one of the three ambiance optimized preset options, Interior, Exterior, Low light, the parameters Global Illumination and Samplings get displayed accordingly. Custom indicates that the preset values of Ambiance and / or Settings have changed.
In the drop down menu choose one of the three rendering optimized settings, Speed, Medium, Quality indicates the predefined rendering quality. Custom indicates that the preset values Ambiance and / or Settings have been changed.
This brings greater depth and relief. Ambient occlusion is simply a simulation of the shadowing caused by objects blocking the ambient light.
Size: values range from 1 to 100cm. This is the size of the shadow from the start of the geometry.
Intensity: Set the power of the shadow.
NB: This is much faster than Global Illumination.
Choose the type of settings: by ISO/Shutter Speed or by Exposure - slide the cursors.
ISO/Shutter Speed:
ISO: Sets the sensitivity of surfaces. Values range from 1 to 32,000.
Shutter Speed: Sets the exposure time. Values range from 1 to 16,000 per second.
Exposure: Values range from 0 to 2. 0, underexposed to overexposed.
NB:These options are also available in the bottom of the Preview window. Clicking on the icon toggles from ISO to Exposure mode.
Allows you to adjust the intensity of the colors.
When the box is checked, White Balance is activated.
Click on the eye dropper then click in Preview to define the White Balance point. Artlantis refers to the clicked color and adjust the colors of the entire view.
Click on Auto button to set the default white balance.
Accuracy: values range from 1 to 5.
This principally concerns indirect light, so it is not useful for exterior views. In the shadows of interiors it helps to reveal details of small objects like door handles. Always start with a value of 1 and increase if necessary.
e.g. the thinness of a hanging lamp bracket: start with 1. If the bracket seems incomplete or deteriorated, increase the level.
Level 1 is faster to render. Increase the level only if details seem insufficiently enhanced.
Hemisphere: values range from 1 to 5.
Controls the number of samples taken to estimate the global illumination at a given location.
Interpolation: values range from 1 to 5.
This is the smoothing distance taken between two samples and the perpendicular; with a low value, rendering is faster. Smoothing applies a reduced lighting.
Adjusts noise in the rendering.
Materials: values range from 1 to 5.
Concerns the diffuse reflection of materials if too much noise in the rendering increases the value. Warning: the more you increase the value, the longer it will take to render.
Lights: values range from 1 to 5.
Affects the lights if too much noise in the rendering increases the value.
The sky acts a light source. Works with any background image. When checked, it makes the sky light emitting.
Must be checked with an HDR image. It is slower to render.
Indicate the path where the rendering will be calculated.
Opens the rendering window, displays the rendering progress and the estimated and elapsed computation times. To stop the rendering, click on the close box of the window.
Postpones the rendering of the current viewpoint; the document is automatically saved. Rendering will be performed using Render Manager.
Note: The Render Later documents need to be saved from an Artlantis atla archive file otherwise it is unable to add the viewpoint to the Batch task list.
Cancel, Render Now or Render Later according to the option chosen above.
|
Artlantis User Guide:VR Objects Rendering Settings |
|
© 2016 Abvent www.artlantis.com |