 Background and Foreground Settings
Background and Foreground Settings
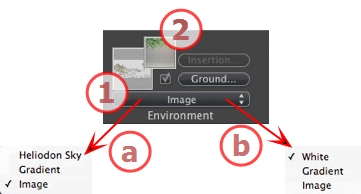
Choose the type of background in the drop-down menu.
a- If a heliodon has been defined with the current viewpoint, the drop-down menu displays:
b- If no heliodon has been defined with the current viewpoint, the drop-down menu displays:
Apply a solid white color to the background.
The background refers to the current heliodon.
Defines a linearly-colored, graduated background.
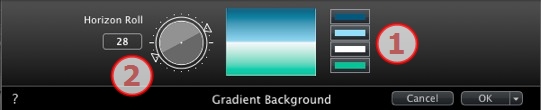
By default, four colors are used, two below and two above the horizon.
Define the linear direction by using the rotation cursor or by typing a value into the associated numeric field.
Background type: 2D, 3D or HDRI
 NB: The file formats supported are: jpg, png, tga, tif, gif, psd, epx, and hdri.

Browse
Browse your hard drive to select an image.
Automatically sets the position of the image to the viewpoint. Click on the thumbnail to define how the image must be placed: by its center, by a side or by a corner.
2D, 3D or HDR. Click on a category to change the status.
NB: If the image is not an HDR image the button will not be activated.
Set the brightness of the image; this affects only the image and not the model. Clicking on the red diode resets the original value. Values go between -100 and 100.
Allows you to move the image position in pixels horizontally (Delta X) or vertically (Delta Y).
The image can be moved graphically by clicking and dragging it into the Preview; the delta X and Y values will be adapted accordingly.
Image Size WxH defines the image size. Type values into the numeric fields, and use the padlock icon to keep the proportion.
Rendering Size WxH displays the rendering size set in the rendering parameters.
Clicking on the button returns to the image to its original size.
Clicking matches the Image Size with the Rendering Size.
Creates a 3D environment.

Browse your hard drive to select an image.
Automatically sets the position of the image to the viewpoint. Click on the thumbnail to define how the image must be placed: by its center, by a side or by a corner.
2D, 3D or HDR. Click on a category to change the status.
NB: If the image is not an HDR image the button will not be activated.
Set the brightness of the image; this affects only the image and not the model. Clicking on the red diode resets the original value. Values go between -100 and 100.
Allows you to move the image position in pixels horizontally (Delta X) or vertically (Delta Y).
The image can be moved graphically by clicking and dragging it into the Preview; the delta X and Y values will be adapted accordingly.
Image Size WxH displays the image size.
Rendering Size WxH displays the rendering size set in the rendering parameters.

Browse your hard drive to select an image.
Automatically sets the position of the image to the viewpoint. Click on the thumbnail to define how the image must be placed: by its center, by a side or by a corner.
2D, 3D or HDR. Click on a category to change the status.
Set the brightness of the image; this affects only the image and not the model. Clicking on the red diode resets the original value. Values go between -100 and 100.
Allows you to move the image position in pixels horizontally (Delta X) or vertically (Delta Y).
The image can be moved graphically by clicking and dragging it into the Preview; the delta X and Y values will be adapted accordingly.
Image Size WxH displays the image size.
Check the box to activate the lights included in the background image. Use the cursor to set the lighting power. Values range from -100 to 100. Click on the red diode retrieves the original power lighting.
NB: An HDR Image can be used for the lighting of a scene by itself, without any other light source. HDR images have a greater dynamic range between the lightest and darkest areas of an image.
 Tip: An HDRI background can be combined with a Heliodon. As regards Artlantis rendering, this is a way of reinforcing the power of the shadows. As regards Maxwell Render Engine, when using an HDRI background, the light of the heliodon is not taken into account. Maxwell does not need to do this in order to manage the shadows.

Browse your hard drive to select an image.
Automatically sets the position of the image to the viewpoint. Click on the thumbnail to define how the image must be placed: by its center, by a side or by a corner.
Set the brightness of the image; this affects only the image and not the model. Clicking on the red diode resets the original value. Values go between -100 and 100.
Allows you to move the image position in pixels horizontally (Delta X) or vertically (Delta Y).
The image can be moved graphically by clicking and dragging it into the Preview; the delta X and Y values will be adapted accordingly.
Image Size WxH defines the image size. Type values into the numeric fields, and use the padlock icon to keep the proportion.
Rendering Size WxH displays the rendering size set in the rendering parameters.
NB: The foreground image must have an alpha channel (representing the opacity or transparency of the image); for example, to view the scene through vegetation.
The accepted file formats are psd, tga, tiff and png.
|
Artlantis User Guide:Foreground Images |
|
© 2013 Abvent www.artlantis.com |