 Perspective Rendering Settings
Perspective Rendering Settings
In the Perspective View Inspector, clicking on the Render icon displays the specific rendering parameters.

 NB: * Formats that cannot use the alpha channel. ** Photoshop PSD multi-layer format.
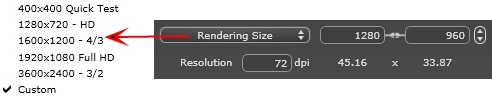
Choose a predefined rendering size or enter the width and height in pixels. Click on the chain to lock/unlock the values.
Set the resolution of the rendering. Determine the pixel size of the image to obtain a printout with the desired dpi and dimensions.
Check that the anti-aliasing is On; set the quality to Low or High.
Tip: To save calculation time, select a low value while increasing the Width/Height of the rendering.
Check that the Radiosity is On. Choose the accuracy in the menu.
This menu allows you to set the accuracy of the parameters using predefined values. If you change the values using the sliders or in the text fields, the menu will be set to custom.
The calculation times depend on the value(s) chosen.
Values from 8 to 96 pixels.
Radiosity is calculated over a small number of pixels, the others are extrapolated. This distance represents the mean distance in pixels between two points where the radiosity is calculated. The shorter the distance, the more the density of the calculated pixels increases.
NB: These settings have a very significant impact on the rendering time.
Values from 48 to 0 pixels.
This is the radiosity from near surfaces (e.g. the corner between two walls). This requires special processing, enabling shadow quality to be refined. The value selected represents the processing range. If 0 is selected, no calculation is carried out. The larger the value, the more effectively the shadows will be calculated with regard to radiosity.
NB: These settings have a significant impact on the rendering time.
In the menu, set a predefined Lighting Interior or Exterior. The menu toggles to Custom Lightning when one of the following commands have been changed: Auto Power Lighting, Physical Camera Parameters or Attenuation/Color Bleeding.
These settings affect the general ambient lighting for the scene. They are used to control precisely how the scene is exposed.
NB: These parameters do not affect the calculation times.
Values from 0 to 1.
Controls absorption of light after one or more surface rebounds. A low value increases the contrast of the scene, thus allowing strong shadows to be cast in an interior scene lit by indirect lighting.
Controls the transfer of colors between surfaces.
When the check box Physical Camera is unchecked:
Values from 1 to 16.
Controls the radiosity level of the first rebound (affects all surfaces receiving direct light from a heliodon or from light sources).
Values from 1 to 16.
Controls the radiosity level of all rebounds after the first bounce. This affects surfaces receiving indirect light.
Increasing the number of rebounds gives more light, particularly for interior scenes.
NB: This parameter has almost no effect on exterior scenes.
When the check box Physical Camera is checked:
Delivers better compliance with the colors and their brightness, as well as better contrast and sharpness.
Sets the sensitivity of the sensitive surfaces. Values from 1 to 32,000.
Sets the exposure time. Values from 1 to 16,000 per second.
Opens the rendering window, displays the rendering progress, and the estimated and elapsed computation times. To stop the rendering, click on the close box of the window.
Postpones the rendering of the current viewpoint; the document is automatically saved. Rendering will be performed using Artlantis Batch.
Indicate the path where the rendering will be calculated.
Cancel, Render Now or Render Later according to the option chosen above.
|
Artlantis User Guide:Perspective Rendering Settings |
|
© 2013 Abvent www.artlantis.com |