Open topic with navigation
 Keyframes and Guides
Keyframes
A keyframe indicates a particular event at an instant T in the scene. Keyframes are linked to the following animated elements: camera, light, heliodon, object, animated textures.
Current animated elements at an instant T: Camera, light; heliodon, object, animated texture.
Animated setting for current element:
Camera: position, rotation, focal, etc.
Light: position, state, type, power, color, etc.
Heliodon: date, time, etc.
Object: position, rotation, scale, etc.
Animated texture: plays the avi or mov sequence.
Animation is interpreted between two keys.
How Keys are Represented
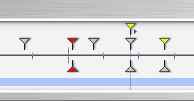
General Information:
- Upper pin indicates a key relative to the current animated element.
- Lower pin indicates that an animated setting of the element is current.
|
Pin
|
Description
|
|

|
An animated element with edit setting activated (in key). Keyframe not selected (gray).
|
|

|
An animated element with edit setting deactivated (no sub- key). Keyframe not selected (gray).
|
|

|
An animated element with edit setting(s) activated. Keyframe selected (red).
|
|

|
An animated element with edit setting deactivated (no sub- key). Keyframe selected (red).
|
|

|
An animated element. Synchronized editing of animated settings for the element in question. Represents overlap of at least 2 keyframes.
|
|

|
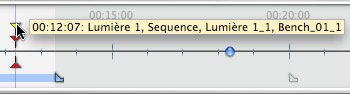
More than one synchronized animated element. Move the yellow pin and the superimposed keys follow. Keyframes selected (red).
- Moving the cursor over a synchronized key (yellow pin) displays the name of the current element, the position in time and the parameters associated with the element.
|
|

|
More than one synchronized animated element. Move the yellow triangle and the superimposed keys follow. Non-selected keyframes.
- Moving the cursor over a synchronized key (yellow pin) displays the name of the current element, the position in time and the parameters associated with the element.
|
|

|
More than one animated elements are synchronized. The elements are not standard. Moving the yellow pin with the arrow moves all superimposed keyframes. Non-selected keyframes.
- Moving cursor over synchronized keys: Displays the information concerning them
- Moving the cursor over a synchronized key (yellow pin) displays the name of the current element, the position in time and the parameters associated with the element.
|
Selecting keys of an animated element.
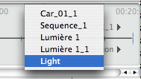
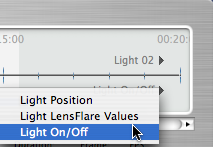
- Right clicking above the slide bar: Enables you to select an animated element.
- Consequences:
- All animated keys corresponding to the element in question display on the slide bar.
- The inspector in question becomes the current inspector enabling the user to edit its parameters rapidly.
 NB: The user can also access the animated element by clicking on the triangle located in the upper right-hand section of the window (above the slide bar).
Selecting keys of the current animated element.
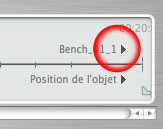
- Right clicking below the slide bar: Displays the animated settings for the current element.The sub-keys matching the setting appear below the slide bar.
- Consequences:
- All sub-keys corresponding to the parameter for the element in question appear on the slide bar.
NB: The user can also access the animated parameter by clicking on the triangle located in the lower right-hand section of the window (below the slide bar).

NB: In order to select the parameter for an animated element, you must first select the element and then select the parameter.
Creating keys
3 options:
- Upon creating a trajectory in 2D View: two keys are created in the Timeline window - one at the start and one at the end of the sequence.
- With record mode turned on in Timeline, right click on the path for the "Add Keyframe" pop-up menu (valid only for one path).
- In the Timeline window with record mode turned on, modify a parameter of the current element.
NB: When an element is no longer animated, turning on record mode will create 2 key images. The one located at the start of the sequence assumes the parameter value before the modification.The second one located in current time assumes the post-modification parameter value.
If the parameter of an element already has keyframes, the record mode creates a single keyframe.This keyframe is located in the current time and has the post-modification parameter value.
NB: Turning on record mode in the Timeline window forces the 2D View to appear when editing keyframes.
Cursor pop-up menu:
Right click on the cursor (blue or red bullet icon).
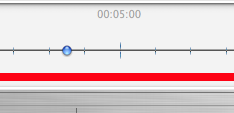
- Add Keyframe:
- Position the cursor on the Timeline.
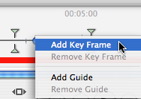
- Right click on the cursor to choose Add Keyframe.
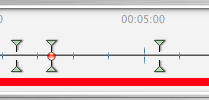
Result: The keyframe is added.
- Delete a Keyframe
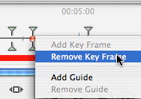
- Right click on the keyframe and choose Delete Keyframe.
Keyboard Shortcuts
- Move a Keyframe:
- Duplicate a Keyframe:
- Alt+Click and drag the pin. (The 2 keyframes have the same value. Hence, they can freeze a parameter at a given time.)
- Moving a set of keyframes for an element (either the camera, lights, heliodon or objects):
- Shift+Click/Dragging the pin results in: all pins to the right of the click moving in a proportional time.
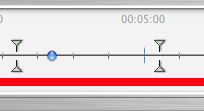
Guides:
These serve as visual Timeline tags  (blue vertical line).
Enables the user to synchronize more than one animated element (e.g.: : moving a camera must match the same instant T as opening a door) or to synchronize animated settings tied to the same element.
- Creating a guide: Double clicking in the Timeline (not on the slide bar) causes a vertical blue line to appear .
- Deleting a Guide: Double clicking on the vertical blue line makes it disappear.
- Moving a guide : Drag and drop.
NB: Moving the cursor on the slide bar near a blue guide magnetizes the cursor. This makes it easier to synchronize parameters among several animated elements.
- Add Guide at the cursor
- Position the cursor on the Timeline.
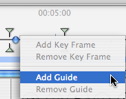
- Right click on the cursor and choose the Add Guide item. Double clic in the Timeline near the cursor will also add the guide for the cursor position.
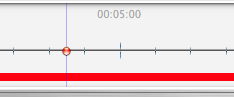
The guide is created.
- Deleting a guide at the cursor
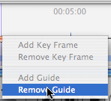
- Right click on the cursor and choose the Add Guide item. You can also double click the guide.