 Preview display
Preview displayThe main working window. This displays the final rendering in real time before any calculation is initiated!
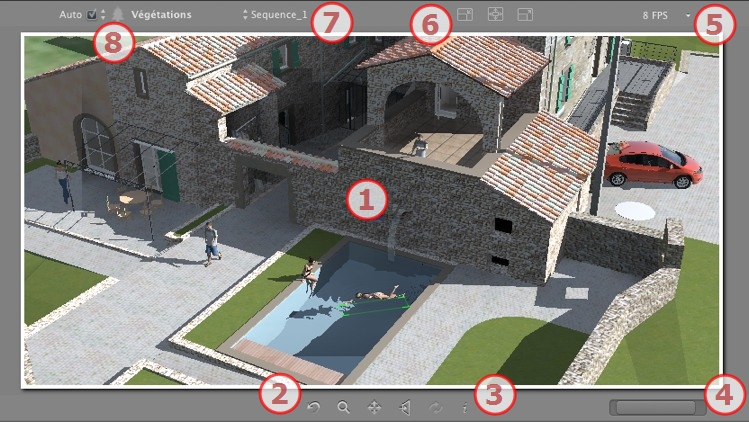
Displays the scene in real time looking as it will be once rendered except for the anti-aliasing which is taken into account. Any changes are immediately reflected.
From left to right: Back, Zoom, Pan, Face To, and Update.
 Resets the camera to the position defined when the view has been activated.
 Moves the camera (the zone defined by a rectangle); Alt+Zoom to move backwards.
 Pans the scene by moving the current camera.
 Positions the camera perpendicular to the clicked surface.
 Saves the viewpoint position (viewpoint, target, focus distance and camera roll). This tool only works when the Automatic Update option is activated in the General Preferences.
Both the toolbar commands (Navigation, Zoom, Pan and Front View) and the Keyboard and Mouse Shortcuts specific to the Preview window are used to navigate within a scene.
 Displays the scene settings.
To adjust the position, use the cursor; to adjust the size, scroll the mouse on the cursor.
To adjust the size, scroll the cursor on the slider. To adjust the position, move the slider to the left or to the right.
Set the fluidity/better image definition when navigating in Preview. Values from 2 to 24 Frames Per Second. The higher the number, the better the fluidity, and lower the number, the better the image definition.
 NB: This has no impact when rendering.
From left to right: Decrease the size, Adjust to the available working space, and Increase the size.
Drop-down menu to navigate in Viewpoints.
Drop-down menu: Destination of a layer when dragging and dropping an object into the scene.
If Auto is checked:
When you drag and drop an object into the scene, it will go into the layer appropriate to its type or into the active layer if there is no default destination layer for this object type.
If Auto is unchecked:
The pop-up menu for the layer shows the destination layer for an object during a drag-and-drop into the scene, as long as there is no default destination layer for this object type.
See "Working with Shaders in Preview"
See "Working with Textures in Preview"
See "Working with Lights in Preview"
See "Working with Objects in Preview"
See "Working with Objects in Preview: Replace Objects"
|
Artlantis User Guide:Preview Window |
|
© 2013 Abvent www.artlantis.com |